First, and most importantly, always check with your doctor to determine their requirements for your specific back issues before starting any new exercise. Our spines are all different and we often need an x-ray to determine exactly what is going on in there. Not all yoga is good for low back pain. In fact many poses will exacerbate the pain and are downright harmful for certain spinal conditions. Make sure you choose a style of yoga that is therapeutic and a knowledgeable yoga teacher or better yet, a yoga therapist, that can guide you safely into movements that will help release your pain and bring you back into alignment. Here are my “Yoga Do’s and Don’ts” that may be a good starting point for you.
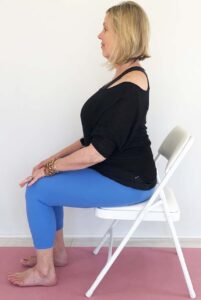
#1 Don’t Lose your Natural Lumbar Curve! Good posture is crucial for having a healthy back. It sounds simple & minor, but your posture may be the root cause of your pain. If you are slumping while you sit and you are sitting for hours every day, you are putting tremendous pressure on your lumbar spine. Also, if you are standing and walking with a “flat back” (posterior tilt) or with an overly arched (anterior tilt) lower back, you are also adding stress to your spine. Your low back should have a natural curve inward throughout the day because it acts as a shock absorber for pressure to your spine.
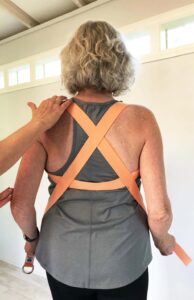
#2 Do Work on your Posture Every Day! We all need different “fixes” for our posture, so if you don’t know what misalignments you have, see a yoga therapist to get a good postural assessment. And then practice, practice, practice good alignment every day. Almost everyone I see these days has somewhat of a forward head due to looking down at our cell phones and working on computers, driving a car or even gardening a lot. The forward head (and its close companion “rounded shoulders”) puts tremendous pressure onto your neck, upper back AND your low back. Low back pain can sometimes be fixed just with pulling your head and shoulders/ribcage back into alignment. And the “yoga backpack” is a key tool for helping “fix” your upper body in order to take the pressure off of your low back (among other areas).

#3 Don’t Walk like a Duck or like Charlie Chaplain! Have you noticed one or both of your feet turning outward while you walk or stand? Walking with your feet externally rotated outward puts more strain on your lower back and eventually can cause chronic back pain. It also may indicate that your piriformis muscle is tight. When tight, the piriformis presses or spasms against the sciatic nerve and can be one cause of sciatica. If you sit a lot, it is essential that you learn ways to stretch your piriformis to keep it flexible and to start walking in alignment, and not like a duck.
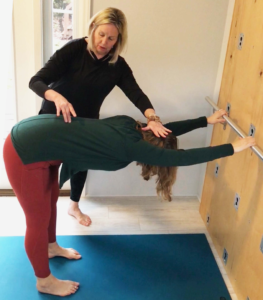
#4 Do Work on Lengthening Your Spine! Gravity, plus a certain amount of aging, can take its toll on your back by compressing the vertebra one on top of the other. To fight gravity and create more space for the vertebra, you need to learn how to traction your spine. Now don’t be thinking this means some medieval torture device nor a super hard yoga pose. One of my favorite poses to help traction the spine is “Kitchen Sink,” or a version of Downward Facing Dog while holding onto a sink (or secure railing). When the arms are straight and your hips are drawn back, you get an amazing stretch and length in your spine. But watch out. If your hamstrings are tight, you need to bend your knees so you don’t flex your spine. And also make sure to engage your abdominals (don’t let them hang down towards the floor and overarch your lumbar). When you do the pose right, it can feel wonderful.

#5 Don’t Stop Moving! Back when I was a girl (a long time ago), my Mom occasionally had terrible low back pain caused by a “slipped disc.” The doctor advised she stay in bed for a week and then gradually over time she started moving again. It seemed to take her a very long time to recover. Today doctors typically want you to do slow, gentle movement when you have back pain. But not all movement is good. You have to know what helps your specific low back condition. In fact, movement that is good for one condition, say, a herniated disc, is bad for another, say spinal stenosis. And if you have been told you have spondylolisthesis (a vertebra that has slipped forward or back from the vertebral column), it’s important to find out if it has slipped forward (anterolisthesis) or backwards (retrolisthesis), because again the healing positions are very different for each of those. Remember, see your medical professional first to determine exactly what is going on in your body and ask what kind of movement is best for your spinal condition.
#6 Do Move with Intelligence! My typical first try at reducing my own low back pain is to do some slow, small pelvic tilts to see if this will ease the pain away. Always do this either sitting in a chair or better yet, on your back in your bed, on a couch or on the floor. If you are supine, make sure to have your knees bent and feet on the surface you are lying on. Then as you begin your gentle, small and slow pelvic tilting, “LISTEN TO YOUR BODY.” Does the pain escalate when you do this? If so, STOP! Does the pain gradually begin to un-grip and reduce a bit? Then, CONTINUE. Your low back will thank you if you pay attention to it. The “no pain, no gain” approach is a horrible lie for anyone who is working with chronic pain. After my pelvic tilting has warmed up my body and hopefully reduced my pain a bit, I choose a yoga therapy sequence designed to help my specific issue. That may be a sacroiliac series of hip flossing and gentle traction for my spine or if sciatica has reared its ugly head, I may opt for either a seated or supine version of the “Figure Four” pose, which will release a tight piriformis muscle. Different poses help different conditions. And don’t rely on Dr. Google to give you the best advice. Ask your medical practitioners or someone trained specifically in how to deal with low back pain.

Remember your “Yoga Do’s and Don’ts” for helping convert your grouchy low back pain into a happy back!
